
Configure Okta as your Identity Provider for SSO
Single Sign-On (SSO) is a great way to improve the security and user experience for your Keepabl account – and Okta is one of our supported Identity Providers, or IdPs.
We’ve prepared this guide so that you can get SSO up and running with Okta as your IdP for Keepabl. For more information, please see our detailed Admin Guide to SSO & Keepabl.
Please note, you need to have Edit rights over Account Settings > Your Organisation in your Keepabl account to set up SSO in Keepabl.
Features
The following provisioning features are supported with Okta as your IdP:
- Create New Users
- New users created through Okta, by assigning the user to Keepabl in your Okta account, will automatically be created in Keepabl.
- Push Profile Updates
- Updates made to a user’s profile in Okta (their name and email address) will automatically be updated in Keepabl.
- Suspend Users
- Deactivate a user in Okta and they will automatically be suspended in Keepabl.
- Unsuspend Users
- Activate a suspended user in Okta and they’ll automatically be unsuspended in Keepabl.
- Delete Users
- If you revoke Keepabl from a user in Okta, or delete them from Okta, we will only receive a deactivation instruction (which is what we receive as an instruction to suspend that user). That user will be suspended in Keepabl, and it’s simple to go to your Account Settings in Keepabl to delete that user from your Keepabl account.
- When you delete a user in Keepabl (even if they’re still active in Okta) we will send a revocation instruction to Okta.
Security
To protect the Security of your Keepabl account and to respect least privilege access practices, any new user assigned to Keepabl in an IdP is created in Keepabl with a ‘blank account’ with no access rights: they’ll see nothing when they login to Keepabl. You can then go to your Account Settings in Keepabl and give them the exact, tailored access rights appropriate for their role.
Now let’s run through the simple steps to use Okta as your IdP for Keepabl.
Step 1: Choose Okta in Keepabl
First log into Keepabl and go to Account Settings > Your Organisation, where you’ll see the Single Sign-On (SSO) section. Click on the Setup Identity Provider button:

You will be taken to the SSO Setup page, where, once you select Okta as your provider, you will see your Base URL, Audience URI (SP Entity ID) and API Token. You will need to enter these into your Okta account.
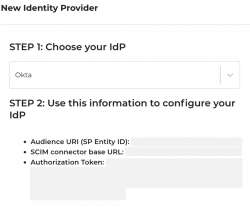
Step 2: Choose Keepabl in Okta
Next, log into your Okta account:
- find and choose the Keepabl app in Okta, and
- enter the Audience URI (SP Entity ID) from Keepabl.
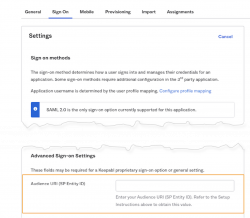
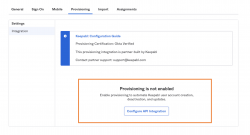
Then enable Provisioning by clicking the Configure API Integration button:
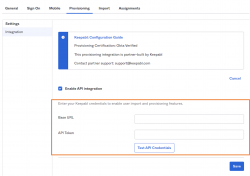
Enter your Base URL and API Token from Keepabl into the relevant fields and click Save:
Now select To App in the left-hand panel, and enable the Provisioning Features you want and click Save. To benefit from the features supported at the top of this page, we recommend ticking the 3 boxes for Create, Update and Deactivate, as shown below:
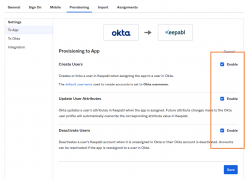
Now you just need your Entity ID, SSO Login URL and X509 Certificate from Okta to put into Keepabl. To get these within Okta, click on the Sign On tab and then the View Setup Instruction button, as shown below:
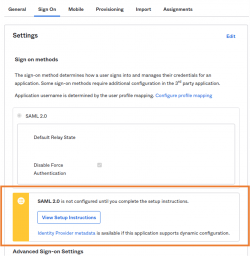
This will open the setup instructions and you will see your Entity ID and SSO Login URL and you can download your X509 Certificate. We’ll now go and enter these into Keepabl.
Step 3: Enter your Okta details in Keepabl
Go back to Keepabl’s Set up SSO page, where you’ve already chosen Okta as your provider, and:
- enter the Entity ID and SSO Login URL you copied from Okta,
- upload the X509 Certificate you downloaded from Okta, and
- click Create Provider
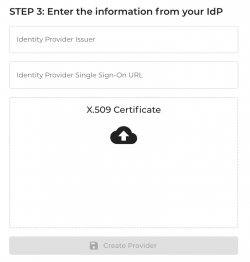
Click Save.
Congratulations! You’ve now set up Okta as your IdP and can now assign people to Keepabl in Okta.
Please reach out to us at support@keepabl.com if you have any issues.

