
Configure Entra ID as your Identity Provider for SSO
Single Sign-On (SSO) is a great way to improve the security and user experience for your Keepabl account – and Microsoft Entra ID (formerly Azure AD) is one of our supported Identity Providers, or IdPs.
We’ve prepared this guide so that you can get SSO up and running with Entra ID as your IdP for Keepabl. For more information, please see our detailed Admin Guide to SSO & Keepabl.
Please note, you need to have Edit rights over Account Settings > Your Organisation in your Keepabl account to set up SSO in Keepabl.
Features
The following provisioning features are supported with Entra ID as your IdP:
- Create New Users
- New users created through Entra ID, by assigning the user to Keepabl in your Entra ID account, will automatically be created in Keepabl.
- Push Profile Updates
- Updates made to a user’s profile in Entra ID (their name and email address) will automatically be updated in Keepabl.
- Suspend Users
- Deactivate a user in Entra ID and they will automatically be suspended in Keepabl.
- Unsuspend Users
- Activate a suspended user in Entra ID and they’ll automatically be unsuspended in Keepabl.
- Delete Users
- If you revoke Keepabl from a user in Entra ID, or delete them from Entra ID, we will only receive a deactivation instruction (which is the same as we receive as an instruction to suspend that user). That user will be suspended in Keepabl, and it’s simple to go to your Account Settings in Keepabl to delete that user from your Keepabl account.
- When you delete a user in Keepabl (even if they’re still active in Entra ID) we will send a revocation instruction to Entra ID.
Security
To protect the Security of your Keepabl account and to respect least privilege access practices, any new user assigned to Keepabl in an IdP is created in Keepabl with a ‘blank account’ with no access rights: they’ll see nothing when they login to Keepabl. You can then go to your Account Settings in Keepabl and give them the exact, tailored access rights appropriate for their role.
Sign-on then Provisioning
To set up Entra ID as your IdP with Keepabl, we’ll first deal with the sign-on part, then the provisioning part. You can also review Microsoft’s Guides on those two overall steps here:
Step 1: Select Entra ID in Keepabl
First log into Keepabl and go to Account Settings > Your Organisation, where you’ll see the Single Sign-On (SSO) section. Click on the Setup Identity Provider button:

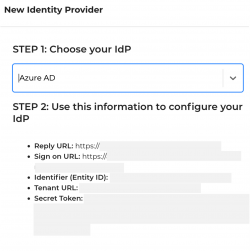
You will be taken to the SSO Setup page, where, once you select Entra ID as your provider, you will see the information you’ll need to enter into your Entra ID account to configure Keepabl for SSO.
Step 2: Select Keepabl in Entra ID
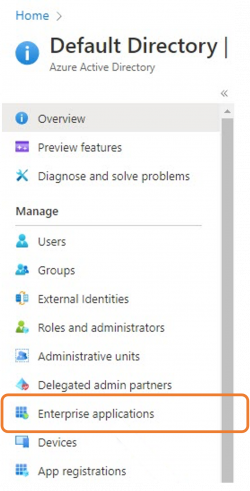
Now log into your Entra ID portal to search for and add Keepabl. First, in Entra ID, go to Enterprise applications:
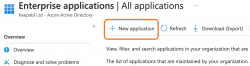
Then click + New application:
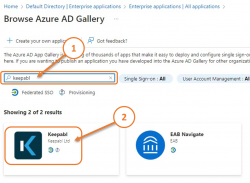
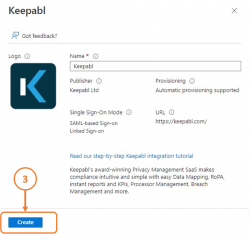
Search for and select Keepabl, then click Create:
Step 3: Set up Sign-On in Entra ID
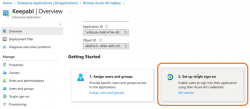
Now you’ll set up Single Sign-On for Keepabl in your Entra ID portal. So, under Getting Started, click Set up single sign on:
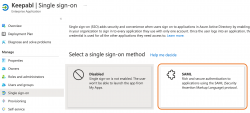
And select SAML as your SSO method:
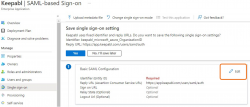
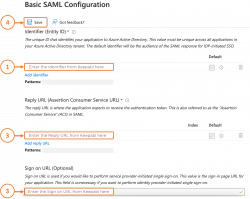
Now we’ll configure SAML, so click Edit in Basic SAML Configuration:
Here is where you’ll enter the details we provided you in Keepabl, into your Entra ID account:
- your Identifier (Entity ID)
- your Reply URL (Assertion Consumer Service URL), and finally
- your Sign on URL (Optional), and
- click Save once you’re done
Step 4: Set up Sign-On in Keepabl
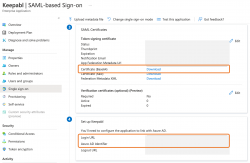
That’s your Keepabl information entered into Entra ID! You’ll now return the favour and enter 3 pieces of information from Entra ID into Keepabl. Still in Single sign on, you’ll see the information you need in Sections 3 and 4:
- in Section 3, SAML Certificates, please download your Certificate (Base 64), and just below that
- in Section 4, Set up Keepabl, you’ll see your Login URL and Azure AD Identifier.
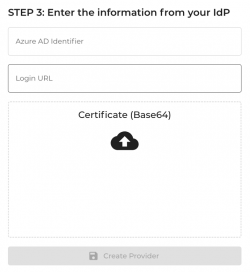
To enter your Entra ID details in Keepabl, return to Keepabl’s Set up SSO page where you chose Entra ID as your IdP and:
- enter your Azure AD Identifier and Login URL,
- upload the Certificate (Base 64) you just downloaded from Entra ID, and
- click Create Provider!
Congratulations! You’ve now set up Entra ID as your IdP for signing into Keepabl. Now – provisioning.
You’ll want to enable provisioning as well as signing on, from Entra ID to Keepabl. You may have already done that (well done you!), but if not, here’s our guide. You can also review Microsoft’s Guide to Provisioning with Keepabl.
Step 5. Automatic provisioning
You’ll want to automatically create, update, and disable users in Keepabl based on user assignments in Entra ID. So, under Overview in your Entra ID portal, click on Provision User Accounts:
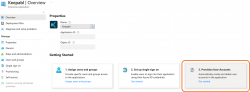
You’ll see the Get started screen, click Get started:
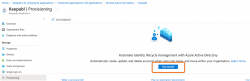
You’ll then see the screen below, use the dropdown to change ‘Manual’ to ‘Automatic’:

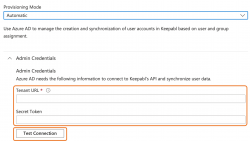
You’ll now be able to enter your Tenant URL and Secret Token from Keepabl, and click Test Connection:
Once testing is successful, you’ll be able to assign users to Keepabl in Entra ID in the normal way (go to Enterprise Applications, click on Keepabl, then Assign Users and Groups).
Congratulations! You’ve now set up Entra ID as your IdP for both sign-on and provisioning, and can now assign people to Keepabl in Entra ID.
Please reach out to us at support@keepabl.com if you have any issues.
Microsoft, Entra and Entra ID are trademarks of the Microsoft group of companies.
KEEPABL is the trade mark of Keepabl Ltd | Company #: 11043685 | Registered office 86-90 Paul Street, London EC2A 4NE | VAT #: 281 5220 22
Keepabl is a regulatory compliance service provided for information only, not legal advice. Always consult your lawyer on legal matters.
Web Design & Development by MazeSpace Studios Ltd